

Basic Guitar Chords Chart: 25 Chords for Beginners
- Rodrigo Moreira
- Mar 10
- 9 min read
Updated: 2 days ago
TABLE OF CONTENTS (Click to jump) |
Hi everyone, Rodrigo here again!
In today’s article, I’ll show you what I consider the most fundamental and essential chords every beginner guitarist should learn. These have been the first chords I’ve taught all my students over the past two decades. We’ll start with an overview of how to read chord diagrams, then I’ll introduce you to the Basic Guitar Chords Chart—a must-know resource for any aspiring guitarist. To wrap things up, I’ll answer some of the most common questions about learning your first chords.
If you want to explore barre chords, I recommend All 48 Essential Barre Chords for Guitar – Free Printable PDF Chart. And if you're into rock and nu-metal and want to learn power chords, don’t miss Learn 24 Power Chords for Beginners: A Must-Have Chart for Rock & Nu-Metal.
If you’re new here, I have a 16-part series on music theory applied to guitar, covering everything from the basics to advanced concepts. You can explore these topics by clicking the links below or visiting the blog section in the top menu:
Simples Intervals -> Compound Intervals -> Triads -> Drop-2 Chords -> Drop-3 Chords -> Shell Chords & Extensions -> Triads & Extensions -> Chord Melody -> Guitar Arpeggios -> Guitar Scales -> Major Keys -> Minor Keys -> Harmonic Minor Keys -> Melodic Minor Keys -> Greek Modes -> Chord Progressions
Hope you enjoy the lesson!
How to Read Guitar Chord Diagrams
How to Read Vertical Lines in Chord Diagrams
At first glance, chord diagrams might remind you of an Excel spreadsheet, but instead of numbers and formulas, they show you exactly where to place your fingers on the guitar neck to play a chord.
Understanding the Vertical Lines
Take a look at a chord diagram, and you'll see six vertical lines. Each one represents a string on your guitar:
The line on the far right corresponds to the thinnest string (1st string).
The line on the far left corresponds to the thickest string (6th string).

Chord Diagrams Vertical Lines
This order stays the same whether you're right- or left-handed.
String Numbers and Names
To make things even clearer, guitar strings are numbered from 1 to 6, starting from the thinnest (1st string) and ending with the thickest (6th string). Here’s a quick rundown of their names:
1st string – E (high E)
2nd string – B
3rd string – G
4th string – D
5th string – A
6th string – E (low E)

Chord Diagrams with Strings' Names
Since the 1st and 6th strings share the same name, we use “high” and “low” to differentiate them—"high E" because it produces a higher pitch and "low E" because it has a lower pitch.
Understanding these string names and numbers is key because this is how guitar instructors communicate. If you hear, "Place your index finger on the B string" or "Move your ring finger from the 1st string to the 3rd string," you’ll know exactly where to go.
How to Read Horizontal Lines in Chord Diagrams
Now, let's talk about the horizontal lines in a chord diagram. These lines represent the thin metal bars on your guitar neck, known as frets. That’s why you might hear the term "fretboard"—it’s simply the neck of the guitar, divided by these frets.

Understanding the Frets
The spaces between the frets are where you'll place your fingers to play notes and chords.
Most chord diagrams start from the 1st fret and cover up to the 4th or 5th fret because that’s where the most common chord shapes are found.
But sometimes, a song will require you to play chords higher up the neck. In that case, the diagram will indicate the starting fret, like this:

In this example, the top horizontal line represents the 5th fret, meaning the next lines correspond to the 6th, 7th, and 8th frets.
Finger Position
The black dots on a chord diagram show you exactly where to place your fingers on the fretboard. Let’s take a look at one of the most common guitar chords: E minor (Em).

In this diagram, you’ll see just two black dots, which means you only need two fingers to play it:
One finger goes on the 2nd space of the D string (4th string).
The other goes on the 2nd space of the A string (5th string).
Now, let’s check out another example—the A minor (Am) chord.

This time, there are three black dots, meaning we’ll use three fingers:
One finger on the 1st space of the B string (2nd string).
One on the 2nd space of the G string (3rd string).
One on the 2nd space of the D string (4th string).
At this point, you might be wondering: "Which fingers should I use for each note?" We’ll get to that in just a second! But first, there’s something important we need to clear up.
A Quick Note on Frets
Earlier, I mentioned that the frets are the thin metal bars on the guitar neck. That’s true! But in everyday guitar talk, the term “fret” is often used to refer to the spaces between those metal bars.
So instead of saying, “Place your finger on the 2nd space of the D string,” we simply say: “Place your finger on the 2nd fret of the D string.”
It means the same thing, but from now on, we’ll use "fret" as a synonym for "space" to keep things simple and consistent.
What Finger Should I Use for Each Note?
Most chord diagrams you’ll find are similar to the ones I just showed you—they often don’t indicate which fingers to use. Many instructors believe that chord fingering is intuitive and that students will naturally find a way to play them. However, I believe this approach can be risky for students.
Not all fingers have the same strength, and certain finger placements can put unnecessary strain on the wrist, potentially leading to long-term injuries. Poor fingering choices can also make learning slower and more frustrating, which may discourage students from practicing.
That said, some chord diagrams do include fingering instructions. These may use numbers inside the dots to indicate which finger to use:
1 = Index finger
2 = Middle finger
3 = Ring finger
4 = Pinky finger

A minor Chord Diagram with Correct Finger Position
Alternatively, some diagrams use letter abbreviations:
I = Index finger
M = Middle finger
R = Ring finger
P = Pinky finger
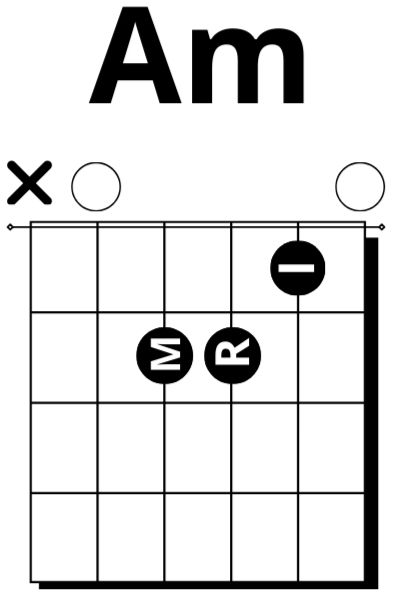
A minor Chord Diagram with Correct Finger Position
Using the correct fingering from the start will help you develop good technique, play more efficiently, and avoid unnecessary strain.
Barre Chord Symbols
Barre chords are a type of chord shape where one finger is used to press down multiple strings at the same time. Because they can be challenging to master, they often lead to frustration for many students.
If you’re just starting out on guitar, I highly recommend reading my article "How to Play Guitar: A Beginner’s Guide to Success!" It covers essential techniques that will help you develop an efficient playing style—and trust me, your future self will thank you!
Now, when it comes to barre chord diagrams, the barre is represented by a thick horizontal black line, typically played with the index finger. However, in some cases, barre chords can also be played using the ring or even the middle finger, depending on the chord shape and musical context.


How Do I Know Which Strings to Strum?
Now that we’ve covered everything related to your fretting hand and how to find each chord note, let’s talk about which strings you should strum for each chord—and which ones you should avoid.
What Does “X” Mean in Guitar Chords?
The “X” symbol, located between the chord diagram and the chord name, indicates which strings should not be played.
In the Am chord diagram below, you’ll see an “X” above the low E string. This means you should avoid or mute that string when strumming the chord.
A minor Chord Diagram In the D chord diagram, there are two “X” marks—one above the low E string and another above the A string. This means both of these strings should be avoided or muted when strumming the chord.

D major Chord Diagram In the Em chord diagram, there are no “X” marks. This means you should strum all the strings when playing this chord.
E minor Chord Diagram
What Does “O” Mean in Guitar Chords?
The “O” symbol, also located between the chord diagram and the chord name, represents an open string. An open string is one that is played without pressing any fingers on the fretboard—but it still needs to be strummed because it’s part of the chord.
For example, in the Am chord diagram, the “O” above the high e string means that you should strum that string along with the other strings where your fingers are placed. The only string to be avoided is the low E string.
Basic Guitar Chords Chart
Just so you know, I have my own way of writing chord diagrams, which differs slightly from the conventional format because I believe it makes things clearer for beginners. In my diagrams, I number every fret, highlight the “X” with a red circle to make it stand out, and use letters to indicate the correct fingering for better guidance.

Click on the chart to expand and download the Basic Guitar Chords Chart or use the link below to download the PDF directly.

FAQ
Are these the easiest chords to learn?
Each of these chords has its own level of difficulty. The easiest is the Em chord, as it only requires two fingers placed on the same fret. On the other hand, the most challenging is the F/C chord, which requires the use of all fingers spread across three different frets.
In what order should I learn guitar chords?
There is no strict order for learning chords, but it's recommended to start with the simplest ones, such as E, Em, A, and Am. Once comfortable, and ideally under the guidance of a good guitar teacher, you should practice chord progressions with similar finger placements. For instance, moving from Am to C only requires shifting the ring finger while keeping the other fingers in place. Similarly, transitioning from C to F/C involves moving the middle finger down one string and adding the pinky below the ring finger. Following this structured approach will help you learn chords more efficiently.
What if I struggle with learning the easiest chords?
Struggling with your first chords is completely normal. Sometimes, all it takes is more practice. However, other factors can affect your progress, including a poorly set-up instrument, incorrect posture, improper technique, and lack of proper guidance. If you want to learn more about these challenges, check out my article: How to Play Guitar: A Beginner’s Guide to Success!
What guitar chords go well together?
Chords that sound good together typically belong to the same key. You can explore my articles on Major Keys, Minor Keys, and Chord Progressions for more in-depth guidance.
What do the numbers next to chords mean?
A "7" after a chord (e.g., Cmaj7, Am7, G7) indicates a seventh chord. You can learn more about seventh chord construction in my articles on Drop-2 and Drop-3 chords.
Numbers like 9, 11, and 13 refer to chord extensions—additional notes that enhance the sound of the chord. You can dive deeper into this topic in my article on Shell Chords & Extensions.
How do you know which fret to play chords on?
First, you need to learn how to locate notes on the fretboard, which involves studying intervals. My article on Simple Intervals covers this in detail.
What are the first three chords I should learn on guitar?
E, Em, and Am.
How do I learn and play sharp and flat chords?
You will need to learn barre chords or use a capo.
How long does it take to learn all the basic guitar chords?
There is no exact timeframe, but I wrote an article comparing the progress of a "lazy," a "prodigy," and an "average" student based on my two decades of teaching experience. You can read about it in the final section of How to Play Guitar: A Beginner’s Guide to Success!
How can I figure out the chords to a song?
If you don't have ear training or experience, it's best to either buy a songbook of the artist or search for a tutorial on YouTube. For example, if you want to learn Enter Sandman, search for "Enter Sandman Guitar Tutorial."
What should I learn after mastering open chords?
Barre chords.
Which chord transitions are the most difficult?
Transitions that require skipping multiple strings and completely changing finger positions tend to be the hardest. For example, switching from an F/C chord to a D chord can be quite challenging.
Where should I place my thumb when playing chords?
It depends on the chord. For chords played on the higher strings (like D major), the thumb can be used to mute unwanted strings. For barre chords, the thumb is typically positioned in the middle of the guitar neck, directly behind the index finger, which is used for barring.
Do professional guitarists play basic chords?
Absolutely! "Basic chords" simply refer to chords that beginners can learn easily, but that doesn’t diminish their importance in music. Even professional guitarists frequently use them.
Wishing you all the best on your musical journey! Looking forward to seeing you here again soon!
Comments